Quick Start
This document is a quick start guide in how to use the OpenEM package. The instructions in this guide still work for newer versions, but usage of the python inference library is encouraged.
Example data
This tutorial requires the OpenEM example data which can be downloaded via BitTorrent here.
Installation
Docker
- Make sure you have installed nvidia-docker 2 as described here.
- Pull the docker image from Docker Hub:
docker pull cvisionai/openem_lite:latest
- Start a bash session in the image with the volume containing the example data mounted. The default train.ini file assumes a directory structure as follows:
working-dir
|- openem_example_data
|- openem_work
|- openem_model
The openem_work and openem_model directories may be empty, and openem_example_data is the example data downloaded at the beginning of this tutorial. The following command will start the bash shell within the container with working-dir mounted to /data. The openem library is located at /openem.
nvidia-docker run --name openem --rm -ti -v <Path to working-dir>:/data cvisionai/openem_lite bash
If using any X11 code, it is important to also enable X11 connections within the docker image:
nvidia-docker run --name openem --rm -ti -v <Path to working-dir>:/data -v"$HOME/.Xauthority:/root/.Xauthority:rw" --env=DISPLAY --net=host cvisionai/openem_lite bash
Note: Instead of $HOME/.Xauthority one should use the authority file listed from executing: xauth info
Launching additional shell into a running container
If the container was launched with --name openem, then the following command
launches another bash process in the running container:
docker exec --env=DISPLAY -it openem bash
Substitute openem for what ever you named your container. If you didn’t name
your container, then you need to find your running container via docker ps
and use:
docker exec --env=DISPLAY -it <hash_of_container> bash
Running the deployment library (0.1.3 and later)
In version 0.1.3 the deployment library has changed from a C++ library with variable language bindings, to a single python library.
In versions 0.1.3 and later there is a unit test for each inference module that runs against the example data
provided above. To run the test suite; launch the openem-lite image with the example data mounted and the
deploy_dir environment variable set appropriately.
The included Makefile in config facilitates this by forwarding the host’s work_dir environment variable to
the container’s deploy_dir variable. In the config directory with work_dir set to
/path/to/the/openem_example_data run make inference_bash.
The inference_bash target launches the nvidia container with recommended settings on device 0; forwarding
port 10001 for potential tensorboard usage.
Running the tests in the container
The unit tests can be used to verify the underlying computing envioronment for inference and serve as a regression test against modifications to optomize image preprocessing or result post processing. The unit tests are also an example usage of the python deployment API.
- Whilst in the container navigate to
/deploy_python - Type:
python -m unittest test
- The results of the tests will print out.
- On machines with limited memory resources, it may be required to run each unit test individually, this can
be done by replacing
testwithtest.CountTestortest.DetectionTest
Training library
To train a model from the example data you will need to modify the configuration file included with the distribution at train/train.ini. This file is included as an example so you will need to modify some paths in it to get it working. Start by making a copy of this file and modify the paths section as follows:
[Paths]
# Path to directory that contains training data.
TrainDir=<Path to OpenEM example data>/train
# Path to directory for storing intermediate outputs.
WorkDir=<Path where you want to store working files>
# Path to directory for storing final model outputs.
ModelDir=<Path where you want to store models>
# Path to directory that contains test data.
TestDir=<Path to OpenEM example data>/test
Extracting imagery
TrainDir is the path to the example training data. WorkDir is where temporary files are stored during training. ModelDir contains model outputs that can be used directly by the deployment library. Once you have modified your copy of train.ini to use the right paths on your system, you can do the following:
python train.py train.ini extract_images
Where train.ini is your modified copy. This command will go through the videos and annotations and start dumping images into the working directory. It will take a few hours to complete. Images are dumped in:
<WorkDir>/train_imgs
Ruler Training
Next, you can do some training. To train the find ruler model you can do the following command:
python train.py train.ini find_ruler_train
This will start training the find ruler model. This will take a while. If you want to monitor the training outside of the command line, you can use Tensorboard. This is a program that serves a webpage for monitoring losses during training runs. Use the following command:
tensorboard --logdir <path to WorkDir>/tensorboard --port 10000
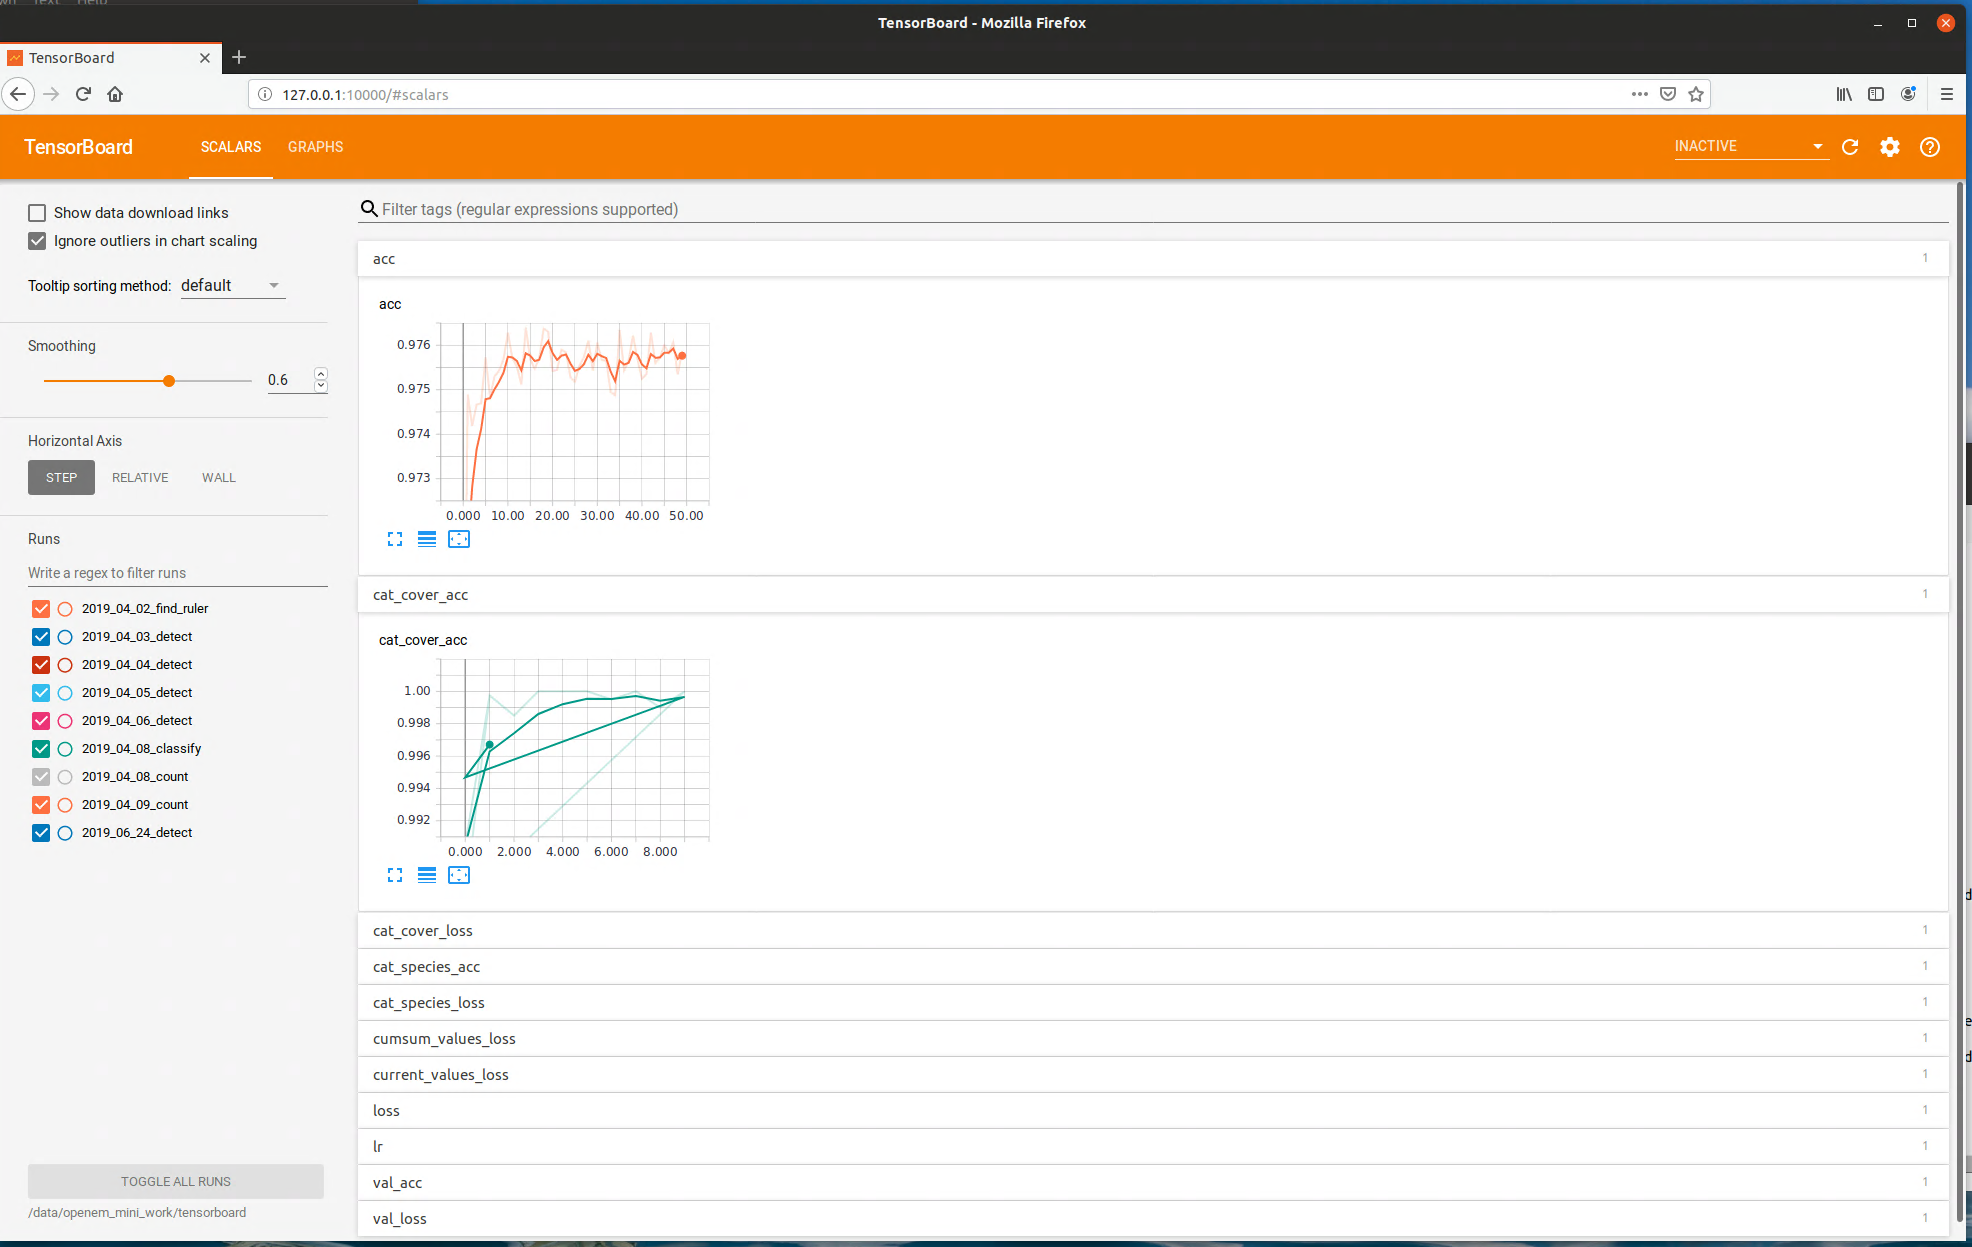 Tensorboard example
Then you can open a web browser on the same machine and go to 127.0.0.1:10000. This will display a live view of the training results. You can also use a different machine on the same network and modify the IP address accordingly. All training steps output tensorboard files, so you can monitor training of any of the openem models using this utility.
Once training completes, a new model will be converted to protobuf format and saved at:
<ModelDir>/deploy/find_ruler/find_ruler.pb
This file is the same format used in the example data for the deployment library.
Running Inference on train/val data
Now that we have a model for finding rulers, we can run the algorithm on all of our extracted images. Run the following command:
python train.py train.ini find_ruler_predict
This will use the model that we just trained to find the ruler endpoints. The outputs of this are stored at:
<WorkDir>/inference/find_ruler.csv
This file has a simple format, which is just a csv containing the video ID and (x, y) location in pixels of the ruler endpoints. Note that this makes the assumption that the ruler is not moving within a particular video. If it is, you will need to split up your videos into segments in which the ruler is stationary (only for training purposes).
It is possible to train only particular models in openem. Suppose we always know the position of the ruler in our videos and do not need the find ruler algorithm. In this case, we can manually create our own find ruler inference file that contains the same information and store it in the path above. So for example, if we know the ruler is always horizontal spanning the entire video frame, we would use the same (x, y) coordinates for every video in the csv.
Extract ROIs for Detection Training
The next step is extracting the regions of interest for the videos as determined in the previous step. Run the following:
python train.py train.ini extract_rois
This will dump the ROI image corresponding to each extracted image into:
<WorkDir>/train_rois
Training Detector
OpenEM supports two detector models. One is the Single Shot Detector the other is RetinaNet. Both models can be trained using the train.py tool within OpenEM. The underlying RetinaNet implementation is a forked version of keras_retinanet.
Train RetinaNet Detector
To properly train the retinanet model, additional steps are required to generate intermediate artifacts for the underlying retinanet train scripts. These
intermediate artifacts are stored in <work_dir>/retinanet. In train.ini, additional parameters are supported for retinanet specifically:
# Random seed for validation split
ValRandomSeed=200
# Validation poulation (0 to 1.0)
ValPopulation=0.2
# Backbone for retinanet implementation
Backbone=resnet152
ValPopulation is used by the retinanet_split to generate a validation population from the overall training population.
Generate required retinanet artifacts
# Generate a csv file compatible with retinanet representing the entire training population (incl. species.csv)
python3 train.py /path/to/train.ini retinanet_prep

# Split population based on ValPopulation and ValRandomSeed
python3 train.py /path/to/train.ini retinanet_split
At this point the split script will print out useful analytics to verify the feasibility of your training set. Some considerations for building a succesful training set:
- If multi-class detection is used, it is important to be coignizant of population count of each class.
- If footage varies by camera, time, a blend across the scenarios is a good idea to be representatitive of operational conditions.
- If a training set is determined to be insufficient it can always be augmented.
Initiate retinanet training
python3 train.py /path/to/train.ini retinanet_train
At this point you will see retinanet training output including losses and current epoch. Tensorboard can be run from <openem_work>/retinanet/train_log
and model files are stored in <openem_work>/retinanet/train_snapshots.
Converting keras-style model to static protobuf format
The keras training script results in a series of h5 files, one for each training epoch. To convert a given epoch to the protobuf format, utilize the
/scripts/convertToPb.py script within the openem-lite container.
An example invocation is:
# Create detection model folder
mkdir -p /data/openem_model/deploy/detect/

# Output epoch 17 to the model area
python3 /scripts/convertToPb.py --resnet /data/openem_work/retinanet/train_snapshots/resnet152_csv_17.h5 /data/openem_model/deploy/detect/detect_retinanet.pb
Running inference with the protobuf graph output
Similar to the SSD procedure train.py can be used to generate detection results on the training population (training + validation).
# Generate a detect.csv from retinanet detections
python3 train.py /path/to/train.ini retinanet_predict
Note: If training both SSD and RetinaNet, care should be taken not to overwrite the respective detect.csv files.
Executing in production environment
The scripts/infer.py file can be used as an example or starting point for production runs of inference. The inputs of the inference script support
both openem flavor CSV and retinanet inputs. This can be used to generate detection results on just validation imagery or batches of test imagery.
Extracting Retinanet Detection Images
The procedure to extract the detection images for retinanet is identical to the SSD procedure.
Train Single Shot Detector
Once all ROIs are extracted, run the following:
python train.py train.ini detect_train
This training will likely take a couple days. As before you can monitor progress using tensorboard.
By default, the model weights saved to protobuf format are those that correspond to the epoch that yielded the lowest validation loss during training. For various reasons we may wish to choose a different epoch. In this tutorial, we will choose a different epoch for the detect model so that it will be more likely to work on fish when they are covered by a hand. To do this use the following command:
python select_epoch.py train.ini detect 8
This will save over the previously saved detection model in protobuf format, using the model weights from epoch 8. This epoch was selected for this tutorial after some experimentation. You can use the select_epoch.py script to select the epoch of any of the four openem models.
Besides using it for selecting an earlier epoch, select_epoch.py can also be used when you wish to terminate a training run early. For example, you may find that a training run has converged (losses are no longer decreasing) after 20 epochs even though you have set the number of epochs to 50. If you stop the training run, the script will not get to the point where it writes the best model to disk in protobuf format. This script will allow you to write the latest epoch to protobuf format manually.
Now we can do detection on all of the ROI images:
python train.py train.ini detect_predict
This will create a new inference output at:
<WorkDir>/inference/detect.csv
Extracting detection imagery
As with the find ruler output, if you have a situation where you do not need detection (you always know where the fish is) then you can create this file manually and continue with the next steps.
Next we can extract the detection images:
python train.py train.ini extract_dets
This will dump all of the detection outputs into:
<WorkDir>/train_dets
Evaluating detection performance
Traditional graphs using mAP metrics can be generated using scripts/detection_metrics.py and scripts/make_pr_graph.py. Example invocation:
# openem_val.csv is the truth data for the validation set
# results.csv is the detection results from the inference results from the validation set
python3 scripts/detection_metrics.py --truth /data/openem_val.csv --output-matrix pr-curve.npy results.csv

# Outputs the PR curve to pr.png
python3 scripts/make_pr_graph.py --output pr.png pr-curve.npy
Advanced usage of detection_metrics.py includes changing sweep parameters of keep threshold, and changing the iou threshold for determining a true positive.
detection_metrics.py --help can be utilized to explore this use-cases.
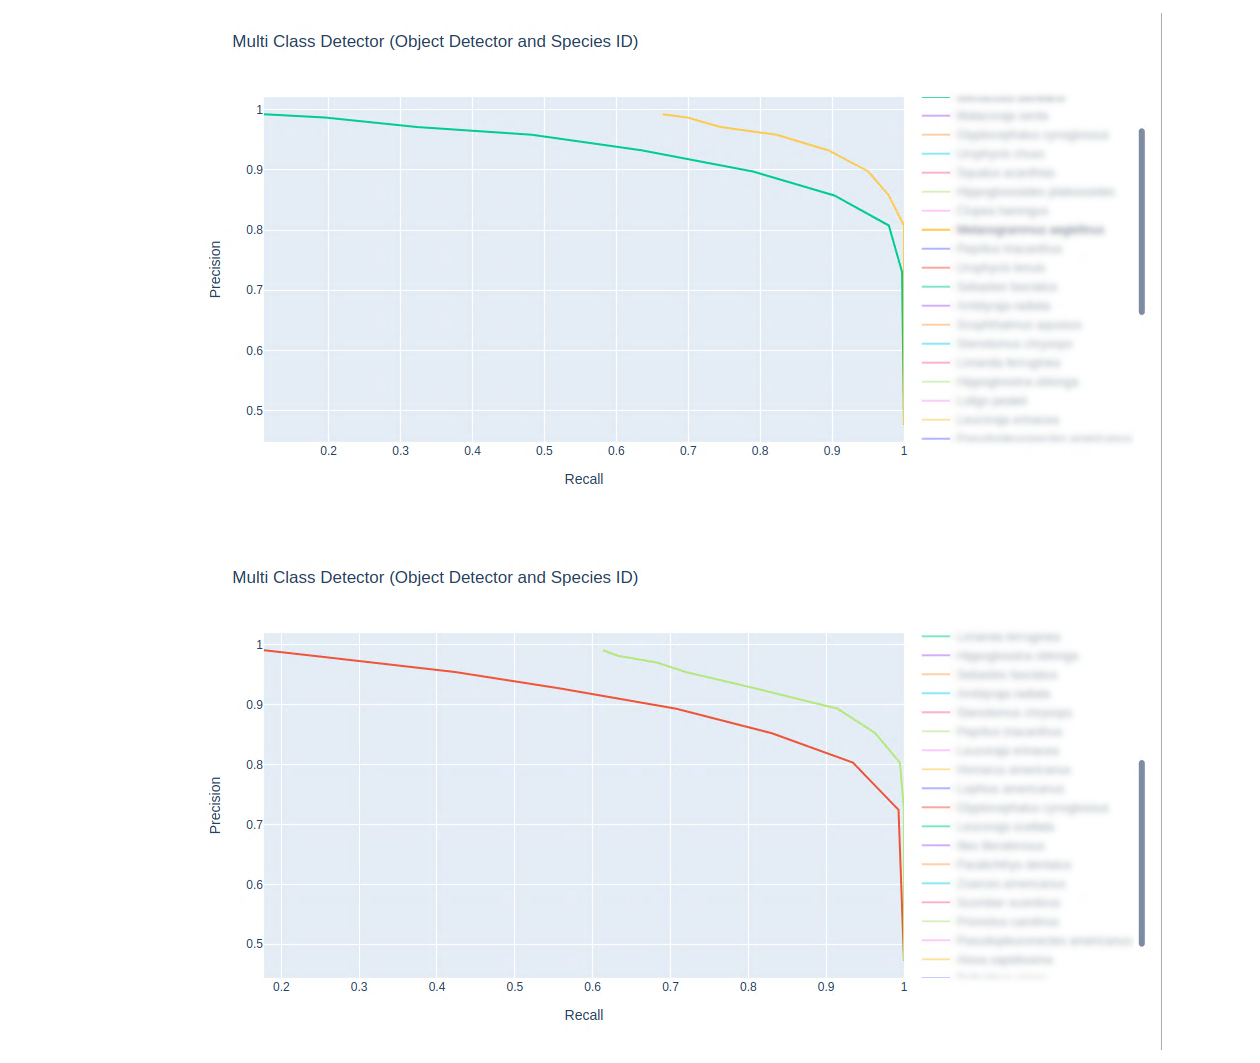 blurred_species
The notebook file in scripts/jupyter/species_graph.ipynb can be used as a foundation to generate interative precision-recall graphs.
Training the rest of the algorithm pipeline
And finally we can repeat the train/predict cycle for the classifier and counting algorithms:
python train.py train.ini classify_train
python train.py train.ini classify_predict
python train.py train.ini count_train
As with other training steps, these will take a while and can be monitored with TensorBoard. We should now have protobuf models in our designated model directory for all four models.
Testing complete algorithm chain
To test our newly trained models, we can use the test videos included with the openem example data. Run the following command:
python train.py train.ini test_predict
This will run the algorithm models end to end on all videos in the TestDir as specified in train.ini. The outputs will be in:
<WorkDir>/test
One csv will be output for each test video, and will contain the keyframe and species of each fish found. We can compare these outputs to the truth data contained in the example data with the following command:
python train.py train.ini test_eval
Building Datasets
Now that you have done training using the example data, you can try doing the same with your own data. Follow the data collection and annotation guidelines to build your own training set. Once you have a dataset, you can modify the train.ini file’s Data section to include new species to match your data, then repeat the same training process you went through with the example data.