OpenEM: Open Source Electronic Monitoring Library
OpenEM is a library that provides advanced video analytics for fisheries electronic monitoring (EM) data. It currently supports detection, classification, counting and measurement of fish during landing or discard. This functionality is available via a deployment library with pretrained models available in our example data (see tutorial). The base library is written in C++, with bindings available for both Python and C#. Examples are included for all three languages.
The current release also includes a training library for the all OpenEM functionality. The library is distributed as a native Windows library and as a Docker image.
Watch the video below to see a video of OpenEM in action:
Quick Start
This document is a quick start guide in how to use the OpenEM package. The instructions in this guide still work for newer versions, but usage of the python inference library is incouraged.
Example data
This tutorial requires the OpenEM example data which can be downloaded via BitTorrent here.
Installation
OpenEM is distributed as a native Windows library or as a Docker image. See below for your selected option.
Warning: The windows binary releases have been deprecated as of
version 0.1.3.
Refer to the python deployment library.
Windows
- Download the library from our releases page.
- Follow the instructions to set up a Python environment.
- Open an Anaconda command prompt.
- Navigate to where you downloaded OpenEM.
Docker
- Make sure you have installed nvidia-docker 2 as described here.
- Pull the docker image from Docker Hub:
docker pull cvisionai/openem:latest
- Start a bash session in the image with the volume containing the example data mounted. The default train.ini file assumes a directory structure as follows:
working-dir
|- openem_example_data
|- openem_work
|- openem_model
The openem_work and openem_model directories may be empty, and openem_example_data is the example data downloaded at the beginning of this tutorial. The following command will start the bash shell within the container with working-dir mounted to /data. The openem library is located at /openem.
nvidia-docker run --name openem --rm -ti -v <Path to working-dir>:/data cvisionai/openem bash
If using any X11 code, it is important to also enable X11 connections within the docker image:
nvidia-docker run --name openem --rm -ti -v <Path to working-dir>:/data -v"$HOME/.Xauthority:/root/.Xauthority:rw" --env=DISPLAY --net=host cvisionai/openem bash
Note: Instead of $HOME/.Xauthority one should use the authority file listed from executing: xauth info
Launching additional shell into a running container
If the container was launched with --name openem, then the following command
launches another bash process in the running container:
docker exec --env=DISPLAY -it openem bash
Substitute openem for what ever you named your container. If you didn’t name
your container, then you need to find your running container via docker ps
and use:
docker exec --env=DISPLAY -it <hash_of_container> bash
Running the deployment library (0.1.3 and later)
In version 0.1.3 the deployment library has changed from a C++ library with variable language bindings, to a single python library.
In versions 0.1.3 and later there is a unit test for each inference module that runs against the example data
provided above. To run the test suite; launch the openem-lite image with the example data mounted and the
deploy_dir environment variable set appropriately.
The included Makefile in config facilitates this by forwarding the host’s work_dir environment variable to
the container’s deploy_dir variable. In the config directory with work_dir set to
/path/to/the/openem_example_data/deploy run make inference_bash.
The inference_bash target launches the nvidia container with recommended settings on device 0; forwarding
port 10001 for potential tensorboard usage.
Running the tests in the container
The unit tests can be used to verify the underlying computing envioronment for inference and serve as a regression test against modifications to optomize image preprocessing or result post processing. The unit tests are also an example usage of the python deployment API.
- Whilst in the container navigate to
/deploy_python - Type:
python -m unittest test
- The results of the tests will print out.
- On machines with limited memory resources, it may be required to run each unit test individually, this can
be done by replacing
testwithtest.CountTestortest.DetectionTest
Running the deployment library demo (0.1.2 and earlier)
- Navigate to examples/deploy/python.
- Type:
python video.py -h
- This will show you the command line arguments to process a series of videos end to end. The command will look something like:
python video.py \
<path to openem_example_data>/find_ruler/find_ruler.pb \
<path to openem_example_data>/detect/detect.pb \
<path to openem_example_data>/classify/classify.pb \
<path to openem_example_data>/count/count.pb \
<path to video 1> <path to video 2> <path to video 3>
- The output will be a csv file with the same base name and location as each video.
Running with Docker
- If you do not want to enter a docker bash shell and instead want to process a video directly, you can use the following command:
nvidia-docker run --rm -ti -v \
<path to openem_example_data>/deploy:/openem_models \
-e find_ruler_model=/openem_models/find_ruler/find_ruler.pb \
-e detect_model=/openem_models/detect/detect.pb \
-e classify_model=/openem_models/classify/classify.pb \
-e count_model=/openem_models/count/count.pb \
-e video_paths="<path to video 1> <path to video 2> <path to video 3>" \
-e CUDA_VISIBLE_DEVICES=0 cvisionai/openem
Deployment library (0.1.2 and earlier)
Navigate to examples/deploy. This directory contains the examples for the main library in the cc directory, plus python and csharp if you built the bindings to the main library. Source files for these examples are located here for your inspection. In addition, there is a script that will run all of the examples for you if you point it to the location of the example data. This script is called run_all.py.
Now invoke the run_all.py script to see how to run it:
python run_all.py -h
This will show you the command line options for this script, and give you an explanation of each of the available examples to run. The simplest way to invoke the script is as follows:
python run_all.py <path to OpenEM example data>
Doing so will run all available examples in all languages for which you built the software.
Once you are able to run the examples, you are encouraged to inspect the source code for the language that you plan to use for your application.
Training library
To train a model from the example data you will need to modify the configuration file included with the distribution at train/train.ini. This file is included as an example so you will need to modify some paths in it to get it working. Start by making a copy of this file and modify the paths section as follows:
[Paths]
# Path to directory that contains training data.
TrainDir=<Path to OpenEM example data>/train
# Path to directory for storing intermediate outputs.
WorkDir=<Path where you want to store working files>
# Path to directory for storing final model outputs.
ModelDir=<Path where you want to store models>
# Path to directory that contains test data.
TestDir=<Path to OpenEM example data>/test
Extracting imagery
TrainDir is the path to the example training data. WorkDir is where temporary files are stored during training. ModelDir contains model outputs that can be used directly by the deployment library. Once you have modified your copy of train.ini to use the right paths on your system, you can do the following:
python train.py train.ini extract_images
Where train.ini is your modified copy. This command will go through the videos and annotations and start dumping images into the working directory. It will take a few hours to complete. Images are dumped in:
<WorkDir>/train_imgs
Ruler Training
Next, you can do some training. To train the find ruler model you can do the following command:
python train.py train.ini find_ruler_train
This will start training the find ruler model. This will take a while. If you want to monitor the training outside of the command line, you can use Tensorboard. This is a program that serves a webpage for monitoring losses during training runs. Use the following command:
tensorboard --logdir <path to WorkDir>/tensorboard --port 10000
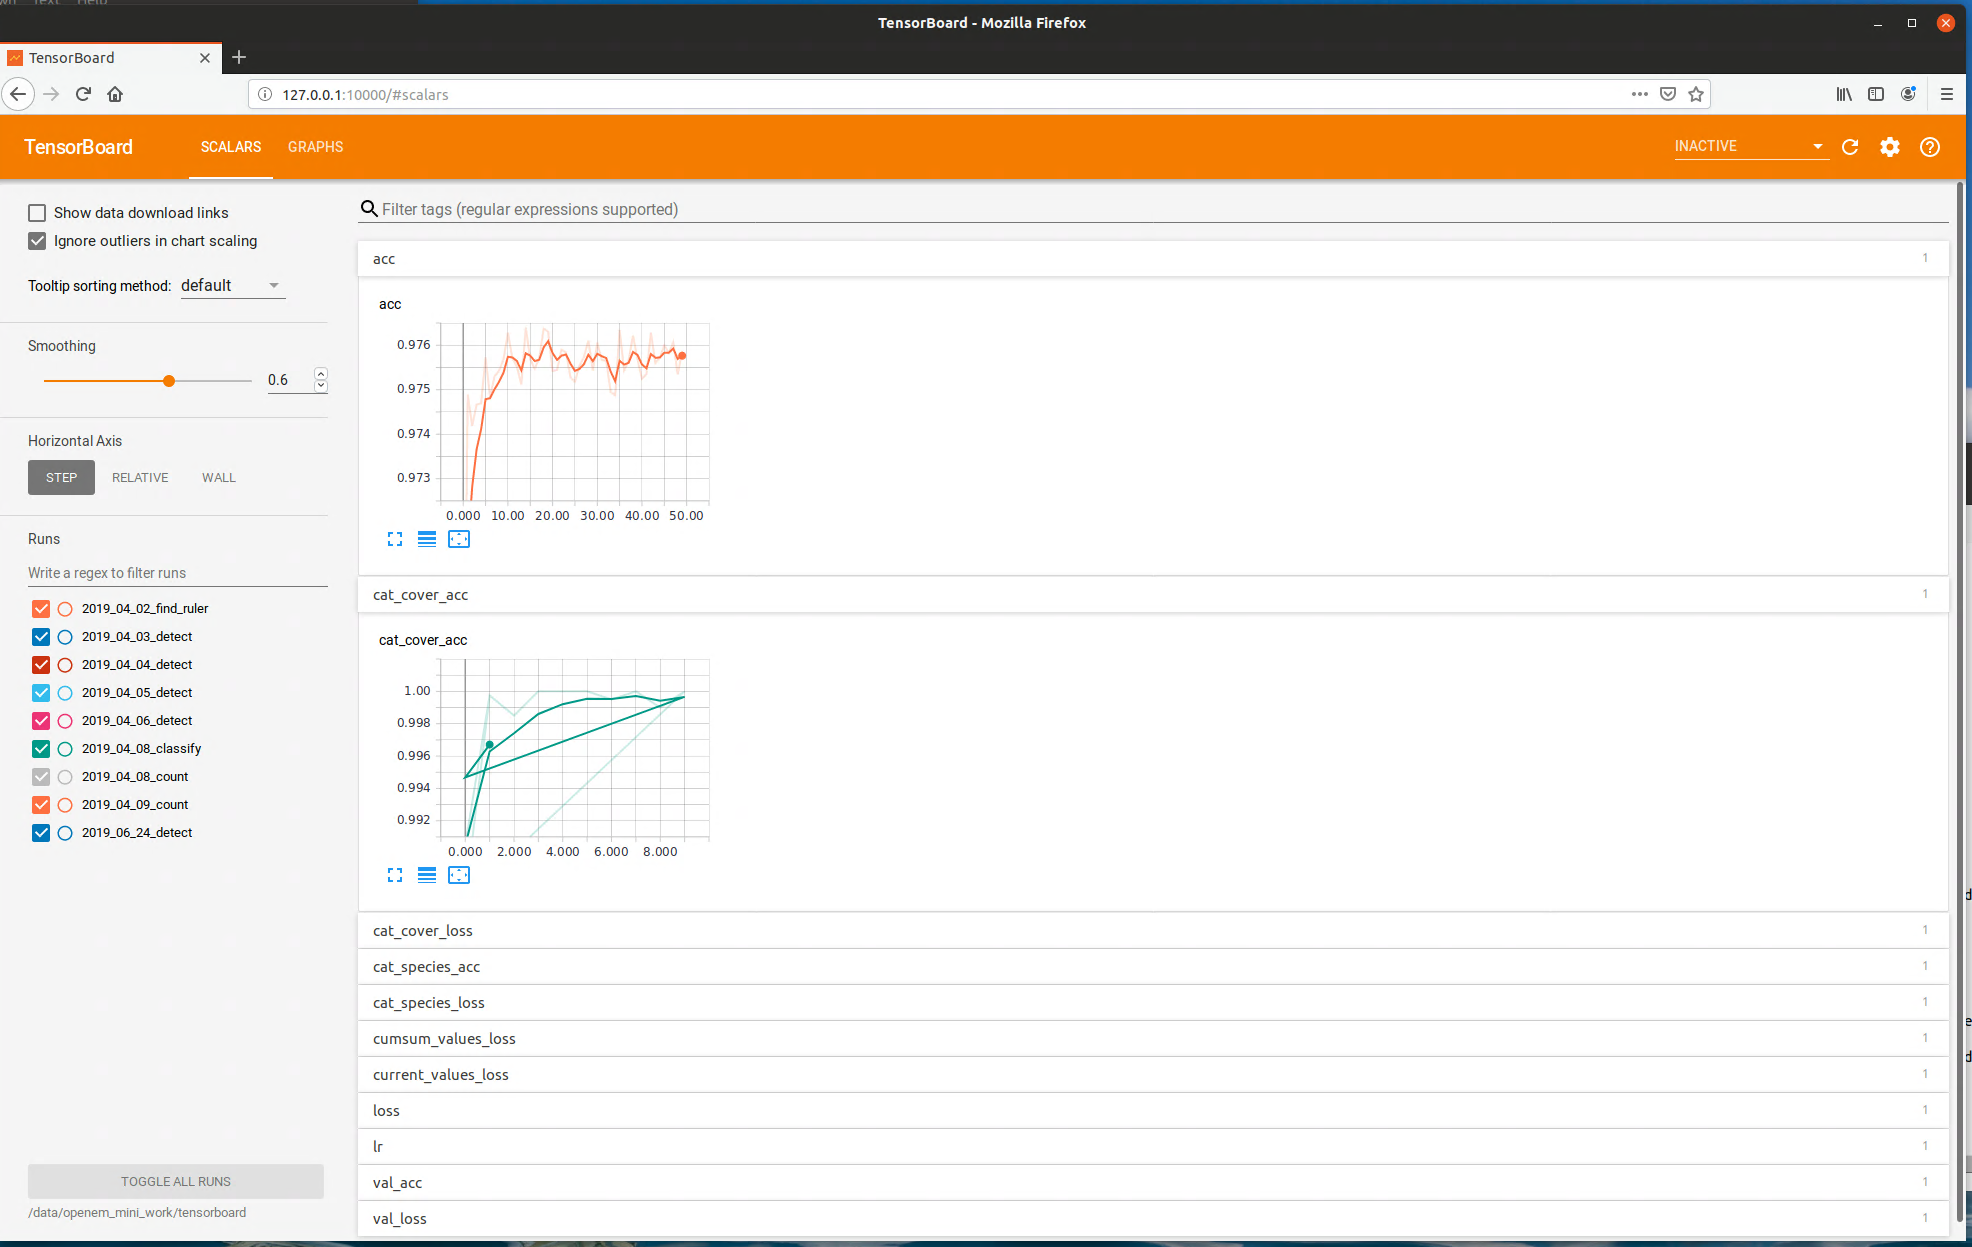 Tensorboard example
Then you can open a web browser on the same machine and go to 127.0.0.1:10000. This will display a live view of the training results. You can also use a different machine on the same network and modify the IP address accordingly. All training steps output tensorboard files, so you can monitor training of any of the openem models using this utility.
Once training completes, a new model will be converted to protobuf format and saved at:
<ModelDir>/deploy/find_ruler/find_ruler.pb
This file is the same format used in the example data for the deployment library.
Running Inference on train/val data
Now that we have a model for finding rulers, we can run the algorithm on all of our extracted images. Run the following command:
python train.py train.ini find_ruler_predict
This will use the model that we just trained to find the ruler endpoints. The outputs of this are stored at:
<WorkDir>/inference/find_ruler.csv
This file has a simple format, which is just a csv containing the video ID and (x, y) location in pixels of the ruler endpoints. Note that this makes the assumption that the ruler is not moving within a particular video. If it is, you will need to split up your videos into segments in which the ruler is stationary (only for training purposes).
It is possible to train only particular models in openem. Suppose we always know the position of the ruler in our videos and do not need the find ruler algorithm. In this case, we can manually create our own find ruler inference file that contains the same information and store it in the path above. So for example, if we know the ruler is always horizontal spanning the entire video frame, we would use the same (x, y) coordinates for every video in the csv.
Extract ROIs for Detection Training
The next step is extracting the regions of interest for the videos as determined in the previous step. Run the following:
python train.py train.ini extract_rois
This will dump the ROI image corresponding to each extracted image into:
<WorkDir>/train_rois
Training Detector
OpenEM supports two detector models. One is the Single Shot Detector the other is RetinaNet. Both models can be trained using the train.py tool within OpenEM. The underlying RetinaNet implementation is a forked version of keras_retinanet.
Train RetinaNet Detector
To properly train the retinanet model, additional steps are required to generate intermediate artifacts for the underlying retinanet train scripts. These
intermediate artifacts are stored in <work_dir>/retinanet. In train.ini, additional parameters are supported for retinanet specifically:
# Random seed for validation split
ValRandomSeed=200
# Validation poulation (0 to 1.0)
ValPopulation=0.2
# Backbone for retinanet implementation
Backbone=resnet152
ValPopulation is used by the retinanet_split to generate a validation population from the overall training population.
Generate required retinanet artifacts
# Generate a csv file compatible with retinanet representing the entire training population (incl. species.csv)
python3 train.py /path/to/train.ini retinanet_prep
# Split population based on ValPopulation and ValRandomSeed
python3 train.py /path/to/train.ini retinanet_split
Initiate retinanet training
python3 train.py /path/to/train.ini retinanet_train
At this point you will see retinanet training output including losses and current epoch. Tensorboard can be run from <openem_work>/retinanet/train_log
and model files are stored in <openem_work>/retinanet/train_snapshots.
Converting keras-style model to static protobuf format
The keras training script results in a series of h5 files, one for each training epoch. To convert a given epoch to the protobuf format, utilize the
/scripts/convertToPb.py script within the openem-lite container.
An example invocation is:
# Create detection model folder
mkdir -p /data/openem_model/deploy/detect/
# Output epoch 17 to the model area
python3 /scripts/convertToPb.py --resnet /data/openem_work/retinanet/train_snapshots/resnet152_csv_17.h5 /data/openem_model/deploy/detect/detect_retinanet.pb
Running inference with the protobuf graph output
Similar to the SSD procedure train.py can be used to generate detection results on the training population (training + validation).
# Generate a detect.csv from retinanet detections
python3 train.py /path/to/train.ini retinanet_predict
Note: If training both SSD and RetinaNet, care should be taken not to overwrite the respective detect.csv files.
The scripts/infer.py file can be used as an example or starting point for production runs of inference. The inputs of the inference script support
both openem flavor CSV and retinanet inputs. This can be used to generate detection results on just validation imagery or batches of test imagery.
Extracting Retinanet Detection Images
The procedure to extract the detection images for retinanet is identical to the SSD procedure.
Train Single Shot Detector
Once all ROIs are extracted, run the following:
python train.py train.ini detect_train
This training will likely take a couple days. As before you can monitor progress using tensorboard.
By default, the model weights saved to protobuf format are those that correspond to the epoch that yielded the lowest validation loss during training. For various reasons we may wish to choose a different epoch. In this tutorial, we will choose a different epoch for the detect model so that it will be more likely to work on fish when they are covered by a hand. To do this use the following command:
python select_epoch.py train.ini detect 8
This will save over the previously saved detection model in protobuf format, using the model weights from epoch 8. This epoch was selected for this tutorial after some experimentation. You can use the select_epoch.py script to select the epoch of any of the four openem models.
Besides using it for selecting an earlier epoch, select_epoch.py can also be used when you wish to terminate a training run early. For example, you may find that a training run has converged (losses are no longer decreasing) after 20 epochs even though you have set the number of epochs to 50. If you stop the training run, the script will not get to the point where it writes the best model to disk in protobuf format. This script will allow you to write the latest epoch to protobuf format manually.
Now we can do detection on all of the ROI images:
python train.py train.ini detect_predict
This will create a new inference output at:
<WorkDir>/inference/detect.csv
Extracting detection imagery
As with the find ruler output, if you have a situation where you do not need detection (you always know where the fish is) then you can create this file manually and continue with the next steps.
Next we can extract the detection images:
python train.py train.ini extract_dets
This will dump all of the detection outputs into:
<WorkDir>/train_dets
Evaluating detection performance
Traditional graphs using mAP metrics can be generated using scripts/detection_metrics.py and scripts/make_pr_graph.py. Example invocation:
# openem_val.csv is the truth data for the validation set
# results.csv is the detection results from the inference results from the validation set
python3 scripts/detection_metrics.py --truth /data/openem_val.csv --output-matrix pr-curve.npy results.csv
# Outputs the PR curve to pr.png
python3 scripts/make_pr_graph.py --output pr.png pr-curve.npy
Advanced usage of detection_metrics.py includes changing sweep parameters of keep threshold, and changing the iou threshold for determining a true positive.
detection_metrics.py --help can be utilized to explore this use-cases.
Training the rest of the algorithm pipeline
And finally we can repeat the train/predict cycle for the classifier and counting algorithms:
python train.py train.ini classify_train
python train.py train.ini classify_predict
python train.py train.ini count_train
As with other training steps, these will take a while and can be monitored with TensorBoard. We should now have protobuf models in our designated model directory for all four models.
Testing complete algorithm chain
To test our newly trained models, we can use the test videos included with the openem example data. Run the following command:
python train.py train.ini test_predict
This will run the algorithm models end to end on all videos in the TestDir as specified in train.ini. The outputs will be in:
<WorkDir>/test
One csv will be output for each test video, and will contain the keyframe and species of each fish found. We can compare these outputs to the truth data contained in the example data with the following command:
python train.py train.ini test_eval
Building Datasets
Now that you have done training using the example data, you can try doing the same with your own data. Follow the data collection and annotation guidelines to build your own training set. Once you have a dataset, you can modify the train.ini file’s Data section to include new species to match your data, then repeat the same training process you went through with the example data.
Data Collection Guidelines
Region of interest
The region of interest (ROI) is the part of the video frame that may contain fish. Although the ROI may be the entire video frame, typically the ROI is only part of it. Some algorithms in OpenEM, such as detection, will perform better if the input images are cropped to the ROI. Therefore, many of the data collection guidelines are driven by recommendations for the ROI, not the entire video frame.
Environment
The example data is all taken during the daytime. Algorithms in OpenEM can work under other conditions, such as with artificial lighting at night or at dawn/dusk for users who wish to train models on their own data. Keep in mind, however, that generally speaking lower variability in appearance will lead to better algorithm performance.
Camera characteristics
Video data is expected to have three channels of color (RGB). Camera resolution is driven by the resolution of the region of interest. The resolution of the ROI should be near 720 x 360 pixels, but lower resolution may still yield acceptable results.
Camera placement
Video should be taken from the overhead perspective, perpendicular to the broadside of any fish in the field of view. We recommend that the camera be aligned with perpendicular within 20 degrees. If possible, the region of interest should be located near the center of the camera field of view to minimize lens distortion.
Use of rulers
OpenEM has functionality that allows for automatic determination of the region of interest. This functionality requires the use of a ruler that will span the region of interest whenever a fish may require detection. See figure 1 for examples of a region of interest spanned by a ruler.
Fish movement
Each fish that is to be detected, counted, classified, or measured should be moved through the ROI in the following way:
- The fish is oriented head to tail horizontally within the ROI. The ROI itself may be rotated within the video frame, but fish within the ROI should be oriented along one of its primary axes.
- The fish should pass through the ROI along a linear path.
- At some point while passing through the ROI, the camera should have an unobstructed view of the fish (no hands or other objects in front of it).
Annotation Guidelines
This document describes the data layout for building your own models with OpenEM. Training routines in OpenEM expect the following directory layout:
your-top-level-directory
├── test
│ ├── truth
│ │ ├── test_video_0.csv
│ │ ├── test_video_1.csv
│ │ └── test_video_2.csv
│ └── videos
│ ├── test_video_0.mp4
│ ├── test_video_1.mp4
│ └── test_video_2.mp4
└── train
├── length.csv
├── cover.csv
├── masks
│ ├── images
│ │ ├── 00000.jpg
│ │ ├── 00001.jpg
│ │ └── 00002.jpg
│ └── masks
│ ├── 00000.png
│ ├── 00001.png
│ └── 00002.png
└── videos
├── train_video_0.mp4
├── train_video_1.mp4
└── train_video_2.mp4
Many of the annotations require video frame numbers. It is important to point out that most video players do not have frame level accuracy, so attempting to convert timestamps in a typical video player to frame numbers will likely be inaccurate. Therefore we recommend using a frame accurate video annotator such as Tator, or converting your video to a series of images before annotating.
Train directory
videos contains video files in mp4 format. The content of these videos should follow the data collection guidelines. We refer to the basename of each video file as the video ID, a unique identifier for each video. In the directory layout above, the video ID for the videos are train_video_0, train_video_1, and train_video_2.
masks/images contains single frames from the videos. Each image in this directory has a corresponding binary mask image in masks/masks. The high values (RGB value of [255, 255, 255]) in the mask correspond to the ruler, and it is zeros elsewhere.
length.csv contains length annotations of fish in the videos. Each row corresponds to an individual fish, specifically the video frame containing the clearest view of each fish. This file is also used to train the counting algorithm, so exactly one frame should be annotated per individual fish. The columns of this file are:
- video_id: The basename of the video.
- frame: The zero-based frame number in the video.
- Choose one of the following annotation styles:
- x1, y1, x2, y2: xy-coordinates of the tip and tail of the fish in pixels.
- x,y,width,height,theta: xy-coordinates of box surrounding the fish in pixels.
- species_id: The one-based index of the species as listed in the ini file, as described in the tutorial. If this value is zero, it indicates that no fish are present. While length.csv can be used to include no fish example frames, it is encouraged to instead include them in cover.csv. Both are used when training the detection model, but only cover.csv is used when training the classification model.
 Length coordinates of a clearly visible fish.
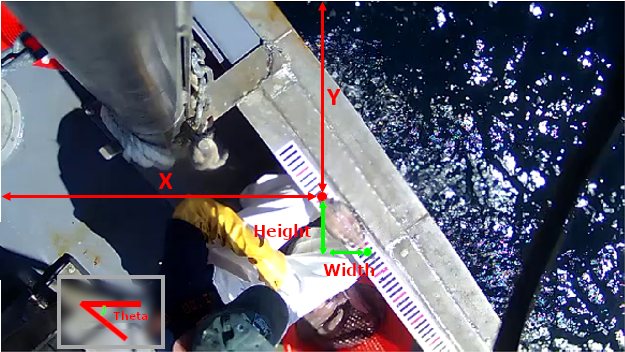 Box coordinates of a clearly visible fish.
cover.csv contains examples of frames that contain no fish, fish covered by a hand or other obstruction, and fish that can be clearly viewed. The columns of this file are:
- video_id: The basename of the video.
- frame: The zero-based frame number in the video.
- cover: 0 for no fish, 1 for covered fish, 2 for clear view of fish.
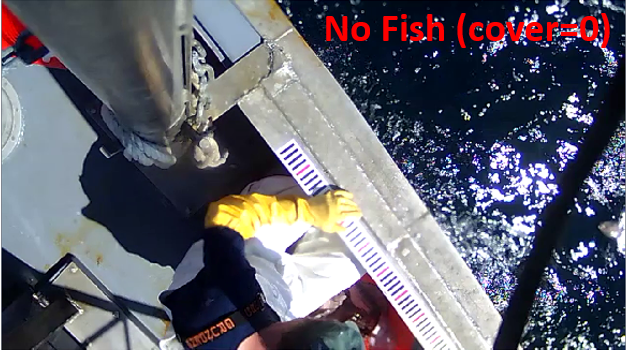 Example of image with no fish.
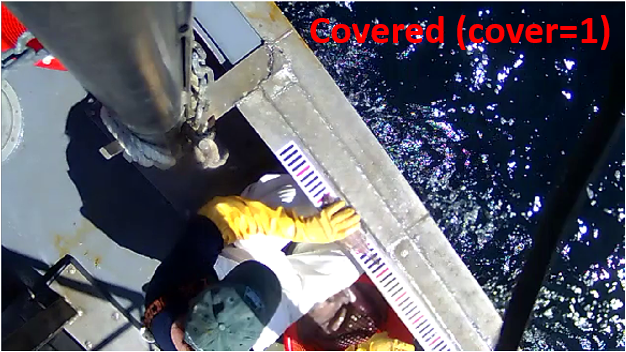 Example of image with covered fish.
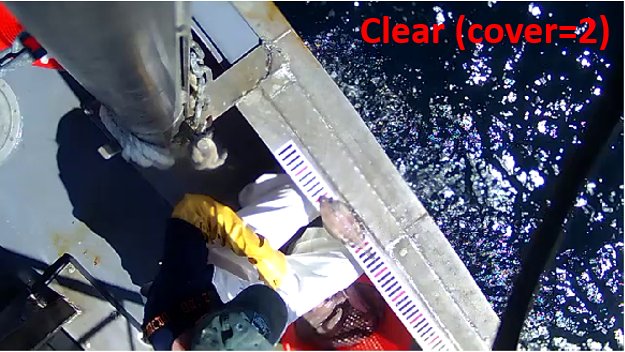 Example of image with clear fish.
Test directory
videos contains videos that are different from the videos in the train directory but collected in a similar way.
truth contains a csv corresponding to each video. Each row corresponds to a fish in the video. The columns in this file are:
- frame: The keyframe for each fish.
- species: Species of each fish.
- length: Length of each fish in pixels.
Skipping training steps
It is possible to train only some models in openem. For example, you may wish to only train the detect model or only the classify model. During training, there are steps in which model outputs are predicted for use in the next model in the pipeline. In each of these cases, the outputs are written to one of:
<WorkDir>/inference/find_ruler.csv
<WorkDir>/inference/detect.csv
<WorkDir>/inference/classify.csv
The name of the file corresponds to the model that generated it. If you would like to skip training one of these models but a model you wish to train depends on one of these files, you will need to generate the missing file manually as if it were part of the training set annotations. Below is a description of each file:
find_ruler.csv contains the ruler position in each video. The columns of this file are:
- video_id: The basename of the video.
- x1, y1, x2, y2: xy-coordinates of the ends of the ruler in pixels.
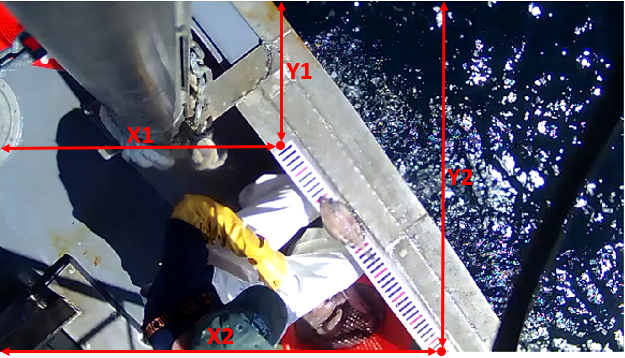 Ruler coordinates for a video.
detect.csv contains the bounding box around fish in the video frames. The columns of this file are:
- video_id: The basename of the video.
- frame: The zero-based frame number in the video.
- x, y, w, h: The top, left, width, and height of the bounding box in pixels. The origin is at the top left of the video frame.
- det_conf: Detection confidence, between 0 and 1. This should be 1 for manually annotation.
- det_species: The one-based index of the species as listed in the ini file.
classify.csv contains the cover and species for the highest confidence detection in each frame. It has the following columns:
- video_id: The basename of the video.
- frame: The zero-based frame number in the video.
- no_fish, covered, clear: Cover category. One of these should be set to 1.0, others should be zero.
- speces__, species_*: Species category. The species__ corresponds to background (not a fish). One of these should be set to 1.0, others should be zero.
Using OpenEM with Docker
OpenEM Lite image
The OpenEM docker image in version 0.1.3 and upwards has been retooled to be
a slimmer image based on NVIDIA’s GPU cloud offerings. The openem_lite image
can be used for both training and inference of OpenEM models.
Installing the image
The docker image is provided from dockerhub, and can be installed with:
docker pull cvisionai/openem_lite:latest
Building the image
- Follow instructions here to install nvidia-docker.
- From the openem config directory run the following command:
make openem_lite
Running outside of docker
Versions 0.1.3 and later of OpenEM do not have a hard requirement of using the supplied docker image. It is possible to install the openem deployment library outside of docker.
Legacy Image (with C++ inference library)
The docker image has only been built on Ubuntu 18.04 LTS. If you simply want to use the docker image you can get the latest release with:
docker pull cvisionai/openem:latest
Building the image
- Follow instructions here to install nvidia-docker.
- From the openem config directory run the following command:
make openem_image
This will generate the dockerfile from the template and execute the build. If not initialized, it will setup any submodules required for the project.
The resulting image will have the OpenEM binary distribution in /openem.
Frequently Asked Questions
From time to time, various questions on how to use OpenEM are asked by the community of users. This document attempts to consolidate the most asked questions to assist new users of the library.
Training & Data curation
OpenEM allows for flexibly deploying parts of the pipeline relevant for a given problem set. With this complexity comes complication in understanding what is required for a given training run. The following flowchart shows the decision tree required for setting up training data.
 Training data flowchart
Deployment API
As of version 0.1.3, the deployment library is a python module. The documentation of the module can be found below.
Installing
In the deploy_python folder, pip3 install . can be used to install the package.
Package openem
OpenEM Inference Deployment Package
Base objects
Define base classes for openem models
-
class
openem.models.ImageModel(model_path, gpu_fraction=1.0, input_name='input_1:0', output_name='output_node0:0', optimize=True, optimizer_args=None)[source]¶ Bases:
objectBase class for serving image-related models from tensorflow
Initialize an image model object model_path : str or path-like object
Path to the frozen protobuf of the tensorflow graph- gpu_fraction : float
- Fraction of GPU allowed to be used by this object.
- input_name : str
- Name of the tensor that serves as the image input
- output_name : str or list of str
- Name(s) of the the tensor that serves as the output of the network. If a singular tensor is given; then the process function will return that singular tensor. Else the process function returns each tensor output in the order specified in this function as a list.
Find Ruler
Module for finding ruler masks in raw images
-
class
openem.FindRuler.RulerMaskFinder(model_path)[source]¶ Bases:
openem.models.ImageModelClass for finding ruler masks from raw images
-
openem.FindRuler.findRoi(image_mask, h_margin)[source]¶ Returns the roi of a given mask; with additional padding added both horizontally and vertically based off of h_margin and the underlying aspect ratio. image_mask: array
Represents image mask- h_margin: int
- Number of pixels to use
-
openem.FindRuler.rectify(image, endpoints)[source]¶ Rectifies an image such that the ruler(in endpoints) is flat image: array
Represents an image or image mask- endpoints: array
- Represents 2 pair of endpoints for a ruler
Detection
Detection Results
-
class
openem.Detect.Detection(location, confidence, species, frame, video_id)¶ Create new instance of Detection(location, confidence, species, frame, video_id)
-
confidence¶ Alias for field number 1
-
frame¶ Alias for field number 3
-
location¶ Alias for field number 0
-
species¶ Alias for field number 2
-
video_id¶ Alias for field number 4
-
Single Shot Detector
-
class
openem.Detect.SSD.SSDDetector(model_path, gpu_fraction=1.0, input_name='input_1:0', output_name='output_node0:0', optimize=True, optimizer_args=None)[source]¶ Bases:
openem.models.ImageModelInitialize an image model object model_path : str or path-like object
Path to the frozen protobuf of the tensorflow graph- gpu_fraction : float
- Fraction of GPU allowed to be used by this object.
- input_name : str
- Name of the tensor that serves as the image input
- output_name : str or list of str
- Name(s) of the the tensor that serves as the output of the network. If a singular tensor is given; then the process function will return that singular tensor. Else the process function returns each tensor output in the order specified in this function as a list.
Retinanet Detector
RetinaNet Object Detector for OpenEM
-
class
openem.Detect.RetinaNet.RetinaNetDetector(modelPath, meanImage=None, gpuFraction=1.0, imageShape=(360, 720))[source]¶ Bases:
openem.models.ImageModelInitialize the RetinaNet Detector model modelPath: str
path-like object to frozen pb graph- meanImage: np.array
- Mean image subtracted from image prior to network insertion. Can be None.
- image_shape: tuple
- (height, width) of the image to feed into the detector network.
Classification
Module for performing classification of a detection
-
class
openem.Classify.Classification(species, cover, frame, video_id)¶ Bases:
tupleCreate new instance of Classification(species, cover, frame, video_id)
-
cover¶ Alias for field number 1
-
frame¶ Alias for field number 2
-
species¶ Alias for field number 0
-
video_id¶ Alias for field number 3
-
-
class
openem.Classify.Classifier(model_path, gpu_fraction=1.0)[source]¶ Bases:
openem.models.ImageModelInitialize an image model object model_path : str or path-like object
Path to the frozen protobuf of the tensorflow graph- gpu_fraction : float
- Fraction of GPU allowed to be used by this object.
Count
Module for finding keyframes
-
class
openem.Count.KeyframeFinder(model_path, img_width, img_height, gpu_fraction=1.0)[source]¶ Bases:
objectModel to find keyframes of a given species
- Initialize a keyframe finder model. Gives a list of keyframes for
each species. Caveats of this model:
- Assumes tracking 1 classification/detection per frame
- model_path : str or path-like object
- Path to the frozen protobuf of the tensorflow graph
img_width: Width of the image input to detector (pixels) img_height: Height of image input to decttor (pixels) gpu_fraction : float
Fraction of GPU allowed to be used by this object.-
process(classifications, detections)[source]¶ Process the list of classifications and detections, which must be the same length.
The outer dimension in each parameter is a frame; and the inner a list of detection or classification in a given frame
classifications: list of list of openem.Classify.Classfication detections: list of list of openem.Detect.Detection
Change Log
| Version | Date | Description of changes |
|---|---|---|
| 0.1.3 | Jan-2020 |
|
| 0.1.2 | June-2019 |
|
| 0.1.1 | Feb-2019 |
|
| 0.1.0 | Jan-2019 |
|